|
1st Battalion, Middlesex Regiment
The Middlesex Regiment
The Boer War or South African War was not the usual little War fought by
professional soldiers with armies largely composed of native troops but a major
war, a serious war, in which the general public became intimately involved.
It had many of the characteristics of the larger world wars, it involved
large armies and masses of ill-trained volunteers, it affected large numbers of
civilian resources of the countries involved, it was affected by technological
changes in warfare and presented great logistical problems, it lasted longer
than any previous conflict since the Napoleonic War. The events of the war were
in three stages: first the Boers beat the British, second the British beat the
Boers, third it all became very messy and this final part became unsatisfactory.
The Boers refused to believe that they were beaten and took to guerrilla
warfare. The British retaliated by burning farms and forming concentration
camps.
The first act of the Boers were besieging a number of towns (Laydsmith,
Kimberly & Mafeking) which kept the British force occupied. This action caught
the attention of the British public which with all the other events, disasters
and change of fortune made the war the most followed by both the public and
Queen Victoria alike.
The British Army in South Africa numbered just under 15,000 troops with a
field force of 47,000 men on their way at the outbreak of the war. This made a
sizable portion of the army. Whereas the South African Army size varied widely
from 30-45,000 men. For most part of the start of the war, the skill in fighting
led to a disastrous outcome of battles due to the British tactics s of frontal
attacks of well fortified positions. Coming to a head between 10-17th
December 1899 which was called "Black Week". The British fortune changed in
January 1900 when a new commander for the army arrived at Cape Town. This was
Lord Roberts who went on the offensive and achieved almost instant success. He
collected all the horses he could and formed units of Mounted Infantry. The
various towns were relieved, and the Boer commander fled to Europe. Boer
resistance came to an end. Lord Roberts returned to England leaving General
Kitchener to deal with the numerous guerrilla bands of stubborn Boers who
refused to quit. The tactic was used to deal with this determined enemy was to
build a line of Blockhouses across the countryside and using a mobile force
drive them into these defensive positions where they would fight or surrender.
The Blockhouse were safe for small arms fire but the building could not with
stand Artillery or explosive fire.
Men of the Middlesex Regiment wore what would have been worn on their arrival
in South Africa. This consisted of the khaki tunic & trousers, gaiters & black
boots. A foreign service helmet covered in khaki material along with the
addition of a neck curtain at the back of the helmet to give added protection
from the sun.
They also wore the "1888 pattern Slade Wallace" valise equipment (belts,
straps, pouches, water bottle & haversack). This series of straps & pouches held
the soldiers ammunition, water , food, bayonet, blanket & other equipment. The
weapon used was the Lee-Enfield rifle introduced in the mid-1890’s and used with
modifications until the end of WWII.
information provided by D.P.&G Publications
.jpg) .jpg)
.jpg) .jpg)
The Second Boer War (Dutch:
Tweede Boerenoorlog,
Afrikaans:
Tweede Boereoorlog), commonly referred to as The Boer War and also
known as the South African War (outside of South Africa), the
Anglo-Boer War (among most South Africans) and in
Afrikaans
as the Boereoorlog or Tweede Vryheidsoorlog ("Second War of
Liberation"), was fought from
11 October
1899 until
31 May
1902, between the
British Empire and the two independent
Boer republics of
the
Orange Free State and the
South African Republic (Transvaal Republic).
The origins of the war were complex, resulting from over two centuries of
conflict between the
Boers and the
British.
The British had in 1806, during the Napoleonic Wars, taken permanent
possession of the Cape Colony and over subsequent decades successive waves of
Boers had migrated away from the rule of the British Empire in the
Cape
Colony, first along the eastern coast towards Natal and then, after
Natal was annexed
in 1843, northwards towards the interior where two independent Boer republics
(the Orange Free State, and the South African Republic - also called the
Transvaal) were established. The British recognised the two Boer Republics in
1852 and 1854 but the annexation of the Transvaal in 1877 lead to the
First Boer War, 1880-1. After British defeats, most heavily at the Battle of
Majuba, Transvaal independence was restored subject to certain conditions
but relations were uneasy.
When in 1886 massive deposits of gold were discovered in the Transvaal, a
huge inflow of
uitlanders (foreigners), mainly from Britain, came to the region in
search of employment and fortune. Gold made the Transvaal the richest and
potentially the most powerful nation in southern Africa but it also resulted in
the number of uitlanders in the Transvaal eventually exceeding the number of
Boers and precipitated confrontations over the old order and the new. Disputes
over uitlander political and economic rights resulted in the failed
Jameson
Raid of 1895. This raid led by (and named after) Dr Leander Starr Jameson,
the Administrator in Rhodesia of the Chartered Company was intended to encourage
an uprising of the uitlanders in
Johannesburg. However Johannesburg failed to rise and Transvaal government
forces surrounded the column and captured Jameson's men before they could reach
Johannesburg.
As tensions escalated from local to national level, there were political
manouverings and lengthy negotiations to reach a compromise ostensibly over the
issue of 'uitlander rights' but ultimately over control of the gold mining
industry and the British desire to incorporate the Transvaal and the Orange Free
State in a federation under British control. Given the number of British
uitlanders already resident in the Transvaal and the ongoing inflow, the Boers
recognised that the franchise policy demanded by the British would inevitably
result in the loss of independence of the Transvaal. The negotiations failed and
in September 1899,
Chamberlain (the British Colonial Secretary) sent an ultimatum to the Boers,
demanding full equality for those uitlanders resident in the Transvaal.
President
Kruger, seeing no other option than war, issued his own ultimatum giving the
British 48 hours to withdraw all their troops from the border of the Transvaal,
failing which the Transvaal, allied with the Orange Free State, would declare
war against the British. The rejection of the ultimatum followed and war was
declared.
The war had three distinct phases. First, the Boers mounted pre-emptive
strikes into British-held territory in Natal and the Cape Colony, besieging the
British garrisons of
Ladysmith,
Mafeking
and Kimberley.
The Boers then won a series of tactical victories at
Colenso and
Spion Kop
against a failed British counter-offensive to relieve the three sieges. Second,
after the introduction of greatly increased British troop numbers under the
command of
Lord Roberts, another and this time successful British offensive was
launched in 1900 to relieve the sieges. After Natal and the Cape Colony was
secure, the British were able to invade the Transvaal and the republic's
capital,
Pretoria, was captured in June 1900.
Finally, beginning in March 1900, the Boers engaged a protracted hard-fought
guerrilla warfare against the British forces. This lasted a further eighteen
months during which the Boers raided targets such as British columns,
telegraph sites,
railways and storage depots. In an effort to cut off supplies to the
raiders, the British, now under the control of
Lord Kitchener, responded with a
scorched earth policy of destroying Boer farms and by moving civilians into
concentration camps.
The campaign had been expected by the British to be over within months, and
the protracted war became increasingly unpopular especially after revelations
about the conditions in the concentration camps (where thousands died of disease
and malnutrition). The demand for
peace led to a
settlement of hostilities, and in 1902 the
Treaty of Vereeniging was signed.The two Republics were absorbed into the
British Empire, although the British were forced to make a number of concessions
and reparations to the Boers. The granting of limited autonomy for the area
ultimately lead to the establishment of the Union of South Africa. The war had a
lasting effect on the region and on British domestic politics. The war, known as
the last British imperial war, was the longest (almost three years), the most
expensive (over £200 million), and the most disastrous of all wars for Britain
between 1815 and
1914.
.jpg) .jpg)
.jpg) .jpg)
.jpg) .jpg)
.jpg) .jpg)
.jpg) .jpg)
.jpg) .jpg)
.jpg) .jpg)
.jpg) 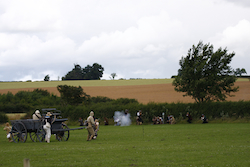
visit DP&G Publications site to purchase
books >> |